Monday, November 1, 2010

SET BUILD AND LIGHTING DESIGN

The first problem that we came across was where we were going to film the changing room scenes. We managed to narrow it down to the Cranliegh arts centre changing room, and the other studio in the school. We decided that doing it in the other studio would probably be best, as it would be easy to light, easy to get all the filming equipment to and easy for all the actors to get to.

As a group we were given a set design sheet, and also a lighting design sheet. We then spent a lesson together, and also a prep preparing these sheets so we could give them ready, and fully complete to out set designer and lighting designer, Dan. We would also run these plans past Luke and John.


We decided that we wanted to go for the look of the band playing in a back street in London. We decided that we wanted to have a corrugated iron backdrop, so it looked as if they were outside a factory or something alike. We also decided that we wanted to have lots of posters and graffiti on the back drop, however the posters are turning out to be hard to get, and we are still working on this.


From the meeting with Dan, we decided that the simpler we could keep it the better. Because of this we decided to stick with shooting the changing room scene in the other studio, as there are mirrors there, and we decided that the most detailed set we wanted was a pavement and some corrugated iron behind us. Dan said that this would all be possible and so we began to arrange all of our props, and how we would get hold of our posters.


Over all the meeting with Dan, Luke and John turned out a success as we now know exactly how we are going to light our set, and exactly what we would like it to look like.


Wednesday, October 20, 2010

CAMERA TEST

We used the Camera test primarily to see if the actors we had chosen to play in our band looked the part in front of the camera. The first thing that we were looking for was to see if the cast were photogenic. If they looked bad on Camera, or didn’t look like we imaged they would, we would then choose someone else. We were also looking to see if the actors were willing to be directed, and were willing to do exactly what we wanted them to do, because if they were nor, they we would have to get rid of them.

What we found was that our actors worked out just right. They all looked photogenic, they all suited their part and they were all willing to do what we wanted them to do. Because of this we didn’t need to try and find any other actors.

STORYBOARD

The storyboard is fairly much the same as the timeline. Except for this time, you are putting a visual to words, instead of a link of an image to the words. What the storyboard does is it enables the producers and directors to see what they feel works visually for the viewer. Also, if the editor is going to try and achieve a style such as balletic editing, then they can draw each shot to slide into the other. They can also work each shot to please the viewers eye. For example, they can draw the pictures onto the hotspots.

Once you have done all of this, you can film each storyboard shot, one by one, and then put the images to the music in sequence. You do this as closely to what you imagine the video to look like, and then once you have done this you can watch the video back and see if the visual works or if it doesn’t work. What we found with ours was that the majority of the shots worked, especially the final shot of the close up of the bands name on the dressing room door. However, we did find that there were a few to many shots which felt as if they lasted to long. This made the visual slightly more boring, and gave us a chance to correct this and make the video quicker, sharper and more interesting.

Tuesday, October 19, 2010

TIMELINE

There are several different reasons for doing a timeline. The first of these is to give the producer and director of the video a rough visual of what the outcome will look like. For a timeline, what will happen is that the creative mind behind the music video will think through the video, writing down shot by shot what they think the video should look like. In this you will write the amount of time each shot should last, the shot numbers and the types of shot and if there is any, the movement of the shot. Once this has all been done for the whole song, the timeline will be read through and you will have a chance to see if everything feels as if it would all work together. If it doesn’t, you can then do it again, which saves you making a video that wont work.


What we found by doing our timeline was that we had far to many shots that we felt would last either to long, or didn’t feel as if they fitted in with the rest of the piece. We found that there were too many of the same shots, so we ended up putting more variation into the piece when it came to drawing the storyboard, which will be explained in the next blog.


The timeline is also very useful to structure the narrative part of the music video. For example, if you want to have a story running through the piece, as well as having a performance aspect, you can use the timeline to structure this story and decide when you feel the most suitable parts of the piece would be to include this story.

Monday, October 11, 2010

General introduction to composition rules

In the 7 Blogs below, I have written about some of the most important composition rules. They are vital to film making, both making the film a more pleasant watch, and also a more interesting one.

Tuesday, October 5, 2010

The Rule of Thirds

The rule of thirds is all about making the film visually pleasing. In the rule of thirds there are 4 different hot spots on the screen, which as you may have guessed split the screen into thirds. On a diagram, there is a hot spot in the top right, top left, bottom right, and bottom left. In a film the top right is the main hot spot, so usually you would put the hero character in that spot. An example of this is in 'The Wild Bunch'. In this film the character Pike is always in the first hotspot.

If you subvert the rule it makes the film a lot more uncomfortable to watch. Some directors do this on purpose. For example, Stanley Kubrick is one director known for doing this.

Editing Techniques

There are many different ways to edit a film, and all these different types of edeting makes the viewer view the film in different ways. What i mean by this, is that you can edit some films to be a comfortable watch for the viewer, and you can also edit some films to be an uncomfortable watch for the viewer.

One form of editing which makes the film a comfortable watch is called balletic editing. Balletic editing is where each time a shot cuts, the next shot will pick up in the same spot on the screen as the last shot finished. A classic example of Balletic editing was in the film "The Wild Bunch". What ends up happening in balletic editing is that the shots end up forming a cirlce, which is comfortable for the viewer to watch, and easy on the eye.

If you were going to make a film uncomfortable to watch for a certian reason you would do the opposite to balletic editing. For example, when you cut from one shot, insted of the next shot starting in the same place, it would start in a completly different part of the screen. This would be hard on the viewers eye as they would be constantly trying to follow the action.

Camera Position and Angles

When shooting a film or an interview, you can make people appear differently to the audience by shooting them in different angles and different positions.

There are general rules as to where to place the camera when interviewing someone and shooting them on film. The first of these is the height of the camera. In an interview for the news or a documentary if you dislike the person you can put the camera at a certain height to make them look bad, or oppositely if you like a person, you can put the camera at a visibly satisfying height. If you shoot a person above the camera, it makes them look arrogant, and it also boosts their importance. However if you put the camera above them, it belittles them, and makes them look meaningless and not important.

The most accepted and supposable the best angle and height to shot a person from is at 32 degrees to the subject, and on the same height. This makes them look normal, and also shows the best angles of a persons face.

Camera Movement


There are two main types of camera movement. These are tracking shots, and crain shots. At Hurtwood, we dont use crane shots, however there are tracks so it is optional to use them.


Tracking shots are shots that move from one side to another. they will usually move from left to right as this is known to be more comfortable on the viewers eye.


Crane shots are the opposite to tracking shots. In crane shots the camera moves upwards and downwards. Crane and traching shots can also be used at the same time, however this does become much more difficult to do.

Colours used in film

when deciding how to light a set and what colours to use, the director will usually think about what emotion he wants to portray to the audience. In film, each colour is known to portray a different kind of image, and you can usually tell a lot about a character and the themes of the film through the use of colour. For example, in the film "The Wild Bunch" the colours used are very pasty, drab and seedy. these are colours such as brown. they also used black and white in certian areas. The reasons for this was because they wanted the area to look like a nasty worly with little colour and also the colour blck means bad, which is what the wild bunch were. It also makes the location look like a washed out world.

Different colours are also known to say a lot about a character in a film. You can usuallt tell alot about a character by the clother that they wear, and what colour they are. For example, somebody who wears lots of red is usually known as an outgoing, active and physical person, where as somebody whom wears lots of grey is usually known as self-reliant and independant.

Monday, October 4, 2010

Lighting

For our A level pieces at Hurtwood House we use two different types of lighting. These are redhead lights, and blonde lights. These are the standard types of lights used. They are ranged between 1000 pounds and 1500 pounds. This is artificial lighting which is more commonly known as tungsten.

When lighting a scene there is usually a norm for doing so. The first form of lighting you would usually use would be a spot light directly in front of the subject. This would light the subjects face as well as their body, however usually there will be one side of the face which is slightly shadowed which means you then have to use other lights to extinguish this shadow. This second light is called a fill light. The fill light is usually at 32 degrees to the spot light. This is a comforting angle for the viewer and it will get rid of the shadow on the subject. The third light used is the back light. The back light is usually around level with the subject, however instead of lighting up the subject, the light it set up to aim towards the wall behind the object to bounce back on to the object and give them a feel of depth on camera. This is the light that is used to create a 3d effect.

Types of Shot's

There are six main different types of shot sizes. Each shot size is used by the director to portray a different type of meaning to the audience member, whether it is to describe an emotion on somebody’s face, or whether it do establish an area or the scenery around it. These six main different types of shot sizes are an Extreme close up, a close up, a mid shot, a long shot, an extreme long shot and a wide angle shot.

Extreme close ups are usually used by the director to really put across a characters fear or amazement etc to the audience. They are usually so close to something that you can only see a certain part of the object. For example, if there was an extreme close up on someone’s face it may only be of their eyes, to show their feelings through their eyes.


Close ups are usually used by the director for the same sort of reason that they would use an extreme close up. They would be used to tell the audience what the character was either thinking or feeling. They can be used to introduce a character, so the audience know what he looks like etc. they are also more commonly used that ECU’s are.


Mid shot’s are shots that show a suitable amount of detail of the character to put their emotion across to the audience, yet it is just far away enough to make the audience feel as if they were looking at the whole subject.


Long Shot’s are used to show the entire person and also to relate them to the surroundings around them. In long shots you can see the whole of the person so you can also read the persons body language as the audience member. This can sometimes put across how the audience member is feeling.

In Extreme long shot’s the subject is incredibly small compared to the overall image. They are usually used to show the audience the area, rather to convey some kind of emotion from a character. They can also be used as establishing shots. These are shots that establish something to the audience. For example, they can be used to establish a setting to the audience.

Wide Shot’s are fairly much the same as extreme long shots. They are again used by the director more to show an area rather than putting across the emotion of the subject. And also like ELS’s, wide shots can be used for establishing shots.

Tuesday, September 21, 2010

Our pitch


Our pitch started of with myself, Ben Marks and Tom Warhurst telling Luke about our favourite idea. This was to do a music video to the song another girl, another planet sung by the Only Ones. The idea was based around a small rock band, touring around the country, and the story of what a regular day for them consists of. For example, there will be a performance scene of the band consisting of four people performing on a street outside, with a background of lost of posters of bands on a corrugated iron wall. There would also be scenes of them in their tour van, crowds at venues and them in their dressing room with groupies. Once we had told him this idea we discussed where any possible weak points were and whether all of our ideas were possible to do. Luckily Luke liked our idea, so he helped us slightly by hinting us in certain directions and then set us on our way. Overall the pitch was a success.

Research and Development


Our research and development started off with me and my group drafting 3 ideas for a music video each, and then between us choosing what we thought was the best idea. Once we had done this, we then started to research that particular song, and how we could shoot our idea for a music video. We started by scanning our original ideas, and finding all the floors in the idea and replacing them with doable ideas. We then researched who we though would be our best suited target audience. To do this, we looked at other videos and compared them to our idea, and from this we found out what our target audience would be. We then went on to shape our idea even further to attract our target audience.

We decided that we liked our idea so much that we put the majority of our time into our main idea, however I did also spend some time doing some research and development into one of my original ideas to do a music video to the clash, London calling. This was more of a safety net for us, so that if our idea was to fall through, I would have a back up plan ready.

Then came the pitching stage of our idea. For this we need to tell our teacher, what our idea was, the different stages of the video, who it was aimed out, what we were trying to portray through the video and how we thought we would do it.

The Five stages of production


1) The first stage is Research and Development. This is one of most important parts of the process as it determines how the majority of your product is done. It consists of both research of the product, and also the development. For pop videos, during the research stage you would need to research your competition, which are the other bands making music videos, and usually of the same genre. You also need to research the target audience. For this you need to decide what age the target audience would be, what gender they would be and also from what social class and background they would be from. Then once you have done all this research, you can look into possible ideas. You would base these ideas best to suit the audience from your previous research.

The development stage is also vital. There are several areas to the development stage. The first of these is the pitch. Once you have done all your research, you will pitch your product (music video) to the production company who you want to fund your video. Once you have done this you will have to create a time line, a treatment, a storyboard, a casting sheet, and the practicalities. You would also have to do camera testing, which is where you check to see if your actors would suit the part, on a camera.

2) The second stage is the Pre-production stage. In this stage you have to produce on of the most important, vital pieces of paper work you will create in the whole production process. This is the call sheet. The call sheet consists of everything! It has all the wardrobe outfits, the conformation of the cast list, the makeup list, the location details, including a map to get to the location. It has all the lighting plans, the set plans etc.

3) The third stage is the production process. This is an obvious stage. It is the stage where you make your film (the shoot day). In this stage you shoot all of the video, ready for editing and after works.

4) The fourth stage is the post production stage. In this stage you will put the film together. You will sort out all of the shots in the editing stage, and also all the credits and music that goes with those shots. You will also add any after works such as SFX, CGI and any animation you want to use.

5) This is the final stage, where you release your product. Even this stage isn’t easy though. For this you need to know where you want to release your product, who to and for how long. This will probably link back to your research, as you are most likely to release your product where it will be seen by your target audience.

Monday, September 13, 2010

Pop Video and Marketing Campaign. Our Brief.

THE BRIEF

You have to create:
- THREE MULTI MEDIA PRODUCTS
- TO ESTABLISH THE IMAGE AND BRAND OF YOUR SINGER AND GROUP and
- HELP SELL THE SONG FROM THEIR FIRST ALBUM.

The group or singer must be a NEW GROUP (even if they are doing a copy of an existing song).

The song is a SINGLE from their FIRST ALBUM.

The actual products to be produced are:
- THE POP VIDEO
- A DIGIPAK for the ALBUM
- A MAGAZINE ADVERT for the ALBUM

Wednesday, March 31, 2010

Evaluation of my post production

1) In our piece we decided that the most effective way to portray Elizabeth’s and her feelings in the scene would be through a one shot sequence. This meant loads of planning as we were constantly having to come up with different ideas on how we were going to be able to keep the audience gripped through one shot lasting two minutes. This meant we needed to find interesting objects that we could track the camera along which would keep the audience thinking. On the day of the shoot we spent the whole morning trying to make this work without actually shooting the piece. One we thought we had set the set up and the tracks up properly we tried to film the shot, only to find that everything was set up to high on the wall and so we had to start over, moving every single prop down the walls and the tracks further back.

2) We decided that because we wanted to do a one shot piece we needed to make the shot slow paced. This was to create as feeling of suspense and horror for the audience. This was one of the main reasons that we spent so mush time on the set, as we needed the mise-en-scene to keep the audiences attention, and create the feelings of suspense and horror which are pre-requisites for the genre and our target audience. However, this made the editing stage easier for us as we only needed to choose the best shot and then add the sounds to this. This made the post production element of non-diegetic sounds a vitally important component.

3) Because we only decided to do one shot, the most important element of the post production was the sound stage. We took all of our sounds from the sound track pro application. We wanted to use the sound to build up the suspense in the scene and use the sound to work off the mise-en-scene, to create the horror aspect. This took a long time as we wanted to time everything together. An example of this is in Jaws, with the way that they repeat the two notes becoming louder and faster as the shark is approaching. In this the music builds the tension and we wanted to re-create this in our scene. Another source of sound that we used were the ambient sounds that we took on the day in the studio. However these sounds were not too effective as they had a fuzzy noise which appeared when we put them into Final Cut Pro. Because of this we couldn’t use the ambient sounds, so we used the non-diagetic sounds from sound track pro.

4) We decided that we wanted to keep the titles and the graphics to a minimum. This was because we wanted to keep the audiences attention on the mise-en-scene rather than distracting them to look at the credits. Because of this we only had credits for the production company and the directors name. We kept these credits as simple as possible, using a plain font with white writing over a black screen. We then faded the credits in and out using the opacity option. The final credit was the title card. We spent lots of time on this as we wanted the scene to end on a high, and this was the last thing that the audience would see. To do the title card, we made a basic outline of 'Elizabeth’s Diary' on Photoshop and then imprinted some of the pictures from the diary into the letters. This really caught the feelings already created by the scene.

5) From the feedback I have received, the choices we have made were very effective. Most of the feedback I have received has said that they enjoyed the parts with the more disturbing images, for example. From this I feel that we could have put in even more disturbing images, and gory moments to create an even more horrific scene. We also received positive feedback about the pace of the scene, however I do not feel that we could slow the pace down any more, otherwise the audience may lose attention and the scene could become boring. This tells me that the piece appealed to the audience, as I haven’t received any negative feedback. Overall I feel the decision that I made were a good success.

Tuesday, March 30, 2010

Audience feedback to our thriller

The comments I received from my friend and others were all very good. I am very pleased as I am yet to receive any criticism, however my father did notice that some of the camera work could have been smother and that the wall was a bit shaky at the beginning. My dad isn’t the target audience, so he may have been looking for mistakes rather than being embroiled in the narrative, like my peers who all enjoyed it and gave me favourable responses as they enjoyed the horror factor. However I am very pleased with the outcome and what people have thought of it. Below I have shown some of the comments I received from facebook and you tube.


hurtwoodhousemedia = The doll hanging is my
 favourite part...well planned and thought out video love it!

hurtwoodhousemedia = that's sooo creepy!! I really like it!


LegasyOleg = Very
 creepy opening. I've jumped on the chair when heard this knock-knock sound! Awesome and really thrilling piece!)

stephaniemareen = I really like the pace of editing
 and the titles. Great Thriller.

William Twigden = Mate, I really liked the piece! Very tense and great sounds used. Well done buddy! ;)

Richard Oxely = Scary stuff bruv, nice one. I liked that messed up bit with the doll!

Wednesday, March 24, 2010

Task 1: The way in which our media products challenges, develops and uses forms and conventions of real media products

We started off our opening sequence introducing our production company. We got this idea off the films made in Hollywood and the way in which they introduce the production companys (the money people) at the beginging of the title sequence of each film.


The second credit that we showed was the director name. The reason for this was because we decided to keep the amount of credits used to a minimal, in order to keep the viewers attention on the sequence rather than the writting on the screen. It also makes the sequence more powerfull and effective as there is nothing to distract the viewer. This is also conforming to the Hollywood style, as the directors name is always shown in the opening sequence.


This image was one of the most important images in our whole title sequence. this image sets up the whole film, with the diary being the reason for Elizabeths eventual death and the series of events that lead up to her death. We also wanted to start the sequence with an important image which get the viewer thinking. This conforms to the Hollywood style as in some films they use a legend, where as we give information about the film away through the diary.


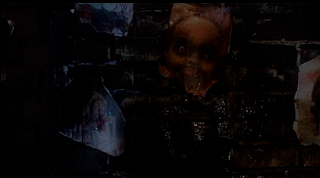
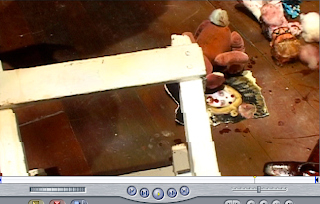
Once again this was an important part of the opening sequence. This was the moment that we first introduced the character of Elizabeth, yet only through a shadow. We also wanted toshow off the set and the distraught immages that we had purposly placed in specific places. This image was suppose to hint to the audience that something bad was happening but without giving anything away. Once again this conforms to Hollywood as in the opening sequence of a film you always see the main character, however we have subverted this by showing her shadow but not her face.


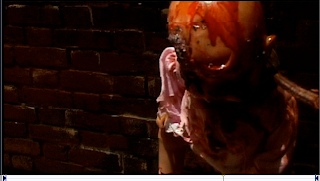
We needed to emphasise this section of the sequence as it was the first obvious time we saw the intention behind Elizabeths thaughts and the more darker, less comical side to her thaughts. We decided that this point was the start of the darker part of the sequence, so we wanted to make it as strong as we possible could. This conforms to the usual Hollywood horror as in the opening sequence they use powerfull gory images, to create a feeling of tension.

This was the part of the sequence where we really expressed Elizabeths thaughts and emotions, through the set and the camera movement. This was the first clue as to what Elizabeth was going to do and it is also one of the most graphical pointsa of the sequences, using the disturbed image of a baby hanging. This once again conforms to the Hollywood style of horrors, as you can see hanging, and mutilation.


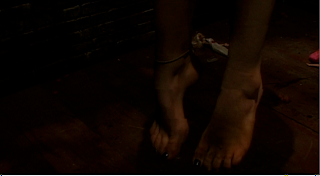
These last two images were by far the most important parts of the scene. This is the climax of the scene, what the whole sequence had been building up to. We wanted to make this section as effective yet almost realistic as possible. To do this we built up all of the music to its peak, so all of the sequence (music, images and ambient sounds) ass peaked at the same poing, creating a strong climax. After this the sequence fades. This area of the sequence subverts from the Hollywood style. Usually in Hollywood you would see everything wher she was being hung, where as in this scene, we only see the girls feet which leaves her identity hidden.

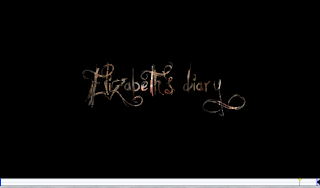
This was one of the hardest parts of the sequence to do. We decided that we wanted to photoshop a title card, which would be the same title card we used throughout the whole process of the film. This included the advertising, the dvd case, the cinema and everything else which includes Elizabeths diary. We got this idea from Hollywood, how all of the films have their one logo, which is used for everything. For example, Batman has the black bat with batman writter underneath it. We spent the most time on this part of the sequence.

Task 2: How does our product represent particular social groups


Our film represents social groups through teenagers and the common case of bullying in a school environment. We also represent the mentally disabled through our main character, who is autistic. An example of a film which deals with the social group of autistic people is Rain Man. Whereas Rain Man deals with happier sides of aspergers ours deals with the darker side of it, in a way more like the book ‘The Curious Incident of the Dog at Midnight’. However, another program that represents teenagers and bullying is the common E4 television programs such as Skins, Glee and 90210. These all deal with the common situations of bullying in a minor scale, compared to our film which deals with harsher bullying, reverting to deeper consequences and worse punishments. Whereas skins shows bullying and consequences on a very small scale, we wanted to show what could potentially happen and what does happen in some cases, at an extremists point of view.


Other films that are similar to this, and that we tried to base some of our characters on are films such as Girl interrupted (including Angelina Jolie), The Ring and The grudge. These films all include one aspect which connects them together. This is that they all include a psychopathic maniac as their main character. We actually based Elizabeth, on the girl out of The Ring. For example, the ring is a film which is based on a young girl who kills every person who watches a video take 7 days later. This is similar to Elizabeth’s diary in the way that she is responsible for the killings, and the killer is a little girl.

They all represent their group by having characters that are constantly alienated, lonely and have mental health problems, and eventually end up doing terrible things to both themselves and others around them. For example, in all the film people around them either suffers similar illnesses (girl interrupted) or death.


Girl interrupted is is a film that was made in 1999. It is about a girl called Sussana who is supposedly forced by her parents to check herself into a mental hospital because of she tried to commit suicide by an overdose of aspirin. Throughout the film Sussan inflicts self harm on herself and is constantly trying to hurt herself. She does this due to being depressed and troubled but ends up being unable to leave, after her (voluntary) check in. This is alike Elizabeth’s diary in the way that Elizabeth attempts to commit suicide.

Suicide and self harming are represented in our film. this was also represented in the media reporting of the group of Bridgend teenagers who commit suicide. The media represented the Bridgend teenagers as being part of a cult and victims in a communtiy driven to dispare through drinks and drugs. Through the space of 13 months from 2007 to 2008 seventeen teenagers committed suicide by hanging themselves. They were all driven to this through being bullied, and fights between a group of friends. The media failed to represent the issues of mental health preoblems and self harming that afflict teenagers. In our film we attampted to adress the issues of mental health and self harming surrounding them eventually leading to our characters susicide.

Task 3: What kind of media institution might distrubute our media product and why


Characteristics of Hollywood Thrillers include stories that employ suspense in order to maintain interest, but thrillers exploit that particular narrative quality as much as possible. Main characters in thrillers are placed in menacing situations from which escape seems impossible. Themes often include terrorism, political conspiracy, love triangles that lead to murder, etc. Often the heroes are ordinary folk who are drawn into danger unknowingly or unwillingly. More often than not, the heroes of these movies are men, but occasionally women take a lead roll (think Linda Hamilton in The Terminator).In Comparison to the stereotypical characteristics of Hollywood Thrillers. Our thriller depicts some similar traits such as the fact that the main character can be juxtaposed to be a woman ( as Elizabeth Carter is the protagonist of our thriller), our themes include student relationship towards each other that leads to murder, and our main character is placed in menacing situations from which escape seems impossible leading to her death, thus i think our film has the potential to be produced by the Hollywood industry if developed further and have a-list professionals star in it.


Lionsgate Films are the sort of film institution that we would look to work with. There are many reasons for this. The first are the previous films that Lionsgate Films. They have been successful with several films, including the horror sequel, SAW, and also My bloody Valentine. All of these films were worldwide success stories earning millions. Lionsgate tend to make films which are either low budget or medium budget horrors. For example My bloody Valentine had a budget of 15 million and made a revenue of 100 million. This was a low to medium budget film. Lionsgate are also known for making good quality films with the money that they have. There are several reasons as to why Lionsgate would be a good Film company for our film to work with. The first reason is the fact that we are making a low to medium budget horror which Lionsgate have done many of. Ours is also a high quality product, and Lionsgate are known for their high quality outcome. We also have no stars involved, and Lionsgate tend to do films with no well known stars, enabling them to spend more money on the film itself. Lionsgate will also be able to advertise our film easily, as they are a well known company. Lionsgate own their own television channels showing horror films and would therefor allow us the oppertunity to advertise our film on their channel to get extra publicity. Lionsgate are also aimed at a male audience which would appeal to our film as it is mainly aimed at a male aidience. They also have their own website which would enable us to promote our film online and they also have distribution links with many countries allowing our film to have worldwide distribution oppertunities. By Lionsgate owning television channels and networks we would have the oppertunity to broadcast our film on the networks increacing our chances of making money. They will also go to lots of film festivals to play their products, so they would be able to advertise ours whilst doing so.


Task 4: Who would be the audience for our media product

I feel that the most obvious target audience to us are people in their late teens and early adult years. We thought that the target audience with the most money to be made out of were 16 to 25 year males, firstly because they are the most likely people to want to watch a thriller and the most likely people to want to watch a gory, chilling film, which ours is.

If I was to be more specific about our target audience, I would say that the social group of people we would aim our film at would be Emo's and Goths. There are a few certain reasons for this. The first is because the character of Elizabeth is based on various different characters from films, who are related with Emo's. Throughout the film Elizabeth is bullied, and so reverts to being an Emo, and dressing like a Goth, inflicting self harm on herself, and also on other, eventually leading to her hanging herself. This means that teenagers in this social group would watch the film in order to relate themselves to Elizabeth. Although Elizabeth is at the extreme end of the spectrum, there are people in this social group who feel the same feelings as Elizabeth and have become Goths and Emo's due to the same reasons that Elizabeth did.

I also feel that although the Horror genre is most commonly watched by boys, I feel that our film would also have a large teenage girl audience. This again is because of them being able to compare themselves to Elizabeth, and her strategies of being able to cope with bullying and peer pressure in a school environment. Also because of the diary. This will attract a female audience as it is mainly teenage girls who write diaries, and again it is a way for them to get their feelings and emotions out, without having to tell anyone about it.

The social group of emo’s do a lot to keep themselves to themselves. They have a very particular style of clothing and makeup. They are stereotypically known for wearing skinny jeans, tight tops, dark clothes, dark make-up and metal toed boots. They are into very different thing to the standard person. For example they listen to bands like Paramour and My chemical romance. They tend not to socialize with anyone who is either different to them, or someone who is a different age to themselves. They are stereotypically known for doing horrible things such as inflicting self pain and doing dangerous amounts of drugs.

As you can see, we have tried to make the film an open film, including many different aspects to attract a variety of different audience members, from all different social classes, social backgrounds and social groups.


Task 5: How our film attracted/adressed the audience

Task 6: What i have learnt about technologies from the construction of Elizabeths diary

Sunday, February 28, 2010

Task 7: Looking back at your preliminary task, what do you feel you have learnt in the progression from it to full product?


The comparison between the Preliminary task and the Opening sequence of a thriller which we just did are very far apart. The first and most obvious difference to us was the planning involved in the process. The preliminary task took us week to plan. It was the third week of term and we were only just starting to settle in as a group, so the planning was fundamental to achieve any success. Luckily, we had most of this done for us though. The teachers planned most of the fundamental things such as the location, the date, the props and the equipment. All we were let to do was to sort out two actors and to storyboard the 20 second sequence. Not a hard task. However the planning for the horror sequence was a very different story. For this we were in charge of everything. As the producer of the film, I was in charge of most of the organisation and planning of the group. The main part of our planning was that we had to do a production folder, including things such as lighting plans, set plans, location ideas, equipment lists, cast lists, costume and makeup lists and also storyboards. If we didn’t have any of these things it would have made the process very difficult. Once we had got all of these sorted out we then had to do a time plan. This was vital as we only had one day to get all of our things sorted out. Only once all of this was done were we ready to shoot.


The camera work used in the Prelim task was very basic. We had very little experience using cameras and so we tended to stick to the more basic shots such as wide shots, mid shots close-ups and occasionally an over the shoulder shot. We would rely mainly on the dialogue from the script to make the movie, rather than experimenting with different camera shots to create an effect for the audience. However this is the total opposite for our opening sequence. We decided to use no dialogue so all of the tension needed to come out of the camera work. We decided that we weren’t going to be so obvious and decided to do a one shot piece, so we needed to plan out the set and the camera movement out very carefully. We were going to do a two minute tracking shot tracking from one side of the set to another, passing through all of the important powerful images on the way through. This took a whole morning to set up as we had to prepare everything to be perfect if it was going to work. In the end it was very much like we had imagined as it was fairly similar to the working storyboard be one shot across the room.


I think that the use of sound has developed the most in-between the Preliminary task and the Horror sequence. In the preliminary task we kept the sound as simple as we possibly could. We just filmed the scene with the camera and used the camera to pick up the dialogue in the scene. When it came to editing the piece we made no changes to the sound. However in the thriller sequence the sound was one of the most important aspects of the sequence, as we didn’t have any dialogue and the shot was only one shot. We filmed all of the sequence and then once we were happy with what we had we decided to try and pick up as many sounds that we possibly could using a boom. We too sounds of all of the obvious sounds in the scene such as the door, footsteps and the chair. We then sourced all of our sounds in the editing stage and once these had been sorted out we decided to add some music to create the tension of the piece. We collected all of our sounds from Sound Cut Pro and added them to the piece and made it so all of the sounds built up to certain moments of tension. We also faded in the sounds and faded out the sounds at some points to create a slick feeling.


One of the main areas that I personally managed to improve in the most was the editing aspect. I spent lots of time working out the sound of the piece and the credits of the piece. These are both done in the Final Cut Pro section. We started of the sequence with the credits, following the Hollywood style of things and then faded into the scene. This was done using the opacity option on final cut pro. Something that we didn’t use at all in the preliminary task. We then spent the whole sequence on the same shot which saved us a lot of time because we didn’t need to cut any shots into each other. We then faded out at the end of the sequence, again something we didn’t use in the preliminary task. The scene finished with the title card fading in (opacity again) and then fading out. To do the title card we used Photoshop and imprinted disturbing images into the letters to give it a creepy effect. Once we had done this we transferred it to Final Cut Pro and this signified the end of the sequence. We then fad out all of the sound to leave just a black screen.


This first shot of the Preliminary task shows how basic our skills were. We used a very standard mise-en-scene with no lighting effects except from some overhead white lights. We also used very standard, basic shots such as wide shots, and close ups. We very rarely tried anything else and only really stuch to the storyboard instead of experimenting.

However in this screen grab you can see that there is a vast difference with the preliminary task. For example, our lighting was very different. We had a dull dim white light to create a damp atmosphere. We also had a haze machine to create a dusky atmosphere. Lastly our camera movement was very different. For example in this scene we used tracks, where as in the preliminary task all of the shots were still shots. We also varied with our distances so we went from close ups to mid shots to create some variation in the scene.

Friday, January 29, 2010

Pictures of the Shoot and set


On the 28th January we shot the sequence, and here are a few stills that we took to show you what the set was like with the film equipment included. We also had a backstage section where the director spent most of her time, watching the monitor, giving advice to the camera crew and the actor.

Tuesday, January 19, 2010

Reasons for the Shooting Schedule

Luckly we are only using one actress, which made palnning our shooting schedual much easier. As Petrie will be free all day we didnt need to organise the schedual to suit her needs. Instead we had a look at the story board and gave every shoot a certian amount of time to shoot them in. We then took all of the time and added up these hours. The final stage of the making of our shooting schedual was to give each time section a certain shoot. We then mooved the shots from the same angle together and our shooting schedual was complete.